
Since that first rock was used to carve another rock into a wheel, humans have had the innate desire to turn raw materials into useful objects. Our evolving society has brought us from stones to metals to plastics, while tools have progressed from rocks to a myriad of more sophisticated devices like drills, grinders and welders.
While the craft of fabricating finished products is taught and written about widely, many useful tips and tricks are left undocumented. Here are some of our favorites; they should help the next time you’re fabricating the bits and brackets needed to make your project a success.
Setup and Measurement
Make Paper Templates:

Cutting and folding steel is not a trivial task, and we prefer to do it only once. We’ll often make a paper template first to test our design for a bracket or part. Office file folders are a useful material for these templates—they’re heavy enough to mimic sheet metal, but light enough to be cut and folded easily.
A paper template allows us to rough out a design quickly, hone the measurements, and make appropriate changes as surprises come up. Then we transfer the template to our steel, and the result is often more functional and attractive. We’ve all heard “measure twice, cut once.” Our mantra is “measure twice, template once, cut once.”
Use a Scriber:
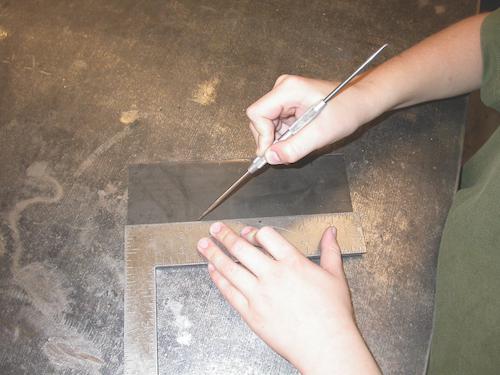
While pencil and permanent marker lines are easy to see, they’re rarely nice and crisp. We prefer to mark cuts using a scriber—also known as a dental tool—as it delivers thin, consistent lines.
The only time we don’t follow this rule is when a part might eventually be subject to severe vibration: any scratch in these parts could cause a stress riser that would eventually lead to a crack and part failure. Nonetheless, most of the time we’re cutting right on the line, so even in shaky areas it’s still appropriate to use a scriber.
Use Dividers to Measure and Mark:

We often need to create a part with a given width or length. Other times, we need to make marks for holes that will be a certain distance apart.
While we can use a tape measure or ruler to transfer these dimensions from one piece to another, we have found a more accurate and efficient way. We set a drafting divider or compass to the dimension we need, then scribe the line by dragging or swinging the divider. This method allows us to maintain very precise dimensions while scribing, increasing both our accuracy and speed.
Measure Holes From the Ends:

Most parts are mounted with two or more fasteners. To complete the job, the hole spacing often has to be transferred from one surface to another. People often try to determine the spacing between the holes by measuring from the center of one hole to the center of the other, which is very hard to accomplish accurately. An easier way is to measure from one side of one hole to the same side of the next hole.
Cutting and Drilling
Clamp Down Your Part:

When drilling, cutting or fabricating, always try to secure your part with clamps or a vise. Attempting to hold the part with one hand while fabricating with the other is dangerous and leads to a low-quality finished product. Just think about it: If the part is dancing around the table while you’re working, accuracy will suffer.
Work Your Way to a Larger Bit:

Drilling a large hole with a big bit is often slow, difficult and inaccurate. Here’s our approach for cleaner, better-centered drilling.
Start with a center punch, drill a pilot hole, and then step up to larger bits. For example, if we need a 1/2-inch hole, we’ll mark our spot with a center punch and then start with a 1/8-inch pilot hole. Then we’ll enlarge that hole with a 5/16-inch bit and finally finish with the 1/2-inch bit.
Cut Wisely:

When cutting bar or angle stock, make sure your blade encounters the least amount of surface area possible. Whether you’re using a hacksaw, cutoff wheel or powered saw, cutting on an edge with a small surface area will take less time and generate less heat than cutting on a large, flat surface.
Using an appropriate lubricant on your drills and saw blades will provide more accurate cuts and also extend the lives of your tools. Purpose-made cutting oils are available, but regular motor oil or even spray lube will work in a pinch.
Saving Time
Use Found Art:

Scrap metal yards, parts cars and the like can often supply helpful brackets and parts for your project. Modifying these components to your needs can save time when compared to starting from scratch. Why do all the work when most of it has already been done?
Save Your Mistakes:

If you make a mistake and have to start over, save the part. It might end up being the “found art” you need for your next project.
Right Angles Are Right:
Keeping things square will save you a lot of setup and layout time. If everything is either parallel or perpendicular to a line, accuracy will improve and measurements will be easy. You might lose some style points, but you can always add flair once you’ve finished the major fabrication and know that the part fits. Just carve off and smooth any unnecessary areas.
Sneak Up on Your Solution:
While this might seem counterintuitive, taking the extra time to occasionally test fit your part will often save time. Doing so helps to catch mistakes earlier. After all, it’s pretty disappointing to make a beautiful bracket that doesn’t fit.
Final Thoughts
Get Benched:

A good bench vise makes a great bending tool. Sometimes, holding a part in the vise and bending it over by hand or with a hammer works well. Other times, it’s best to fold a part using the jaws of the vise. Either way, using the jaws, edges and clamping force of the vise will improve your parts.
If You Need a Welder, Find One:
If you’re not a competent welder, that shouldn’t stop you from fabricating complex parts. You can always tack weld things together, but be sure to have a professional or a talented friend finish the job. Welding can slightly change the shape of your part, so you might need to make some adjustments after the pro is done.
Radius the Corners:

Looking for a nice finishing detail? Radius the corners on your pieces. Use a washer to mark off an attractive radius line, then sand or grind the part to that shape.
Use Bolts Properly:

Bearings, rod ends and other moving parts should not ride on the threads of a bolt or stud, only on the shoulders.
And, of Course, Keep It Safe:
Wear the right protective gear when you’re working. Protect your eyes, ears and limbs at all times and wear appropriate clothing. Stay away from clothes that fit loosely or have holes.